Category Archives: Uncategorised
Plugs are chopped sections of instant roll on grass. Each section has nodes (joints) which will produce growth, if properly planted. True Blue Turf offers a plug planting service for areas over 1,000m2.
Stolons/runners being propagated from selected strains are true- to-type and are weed free.
Planting plugs or stolons/runners is best done in the warmer months of spring, summer and early autumn. Turf establishment through the use of stolons normally takes approximately 12 months for full coverage.
STOLONS/RUNNERS FROM SHREDDED TURF
1. Keep the bag(s) of stolons/runners in the shade and keep them moist.
2. Spread the shredded stolons/runners evenly over a well-watered soil surface at a rate of 50m2 per bag.
3. Work in manageable areas of not more than 50m2 at a time. In hot and dry weather conditions, work on a smaller area to avoid exposed runners drying out.
4. Spread as evenly as possible to ensure even coverage.
Spreading cannot be done in windy conditions.
Note: Buffalo runners should be planted in rows approximately 150mm apart. For Buffalo skip steps 5, 6, 7.
ROLLER DISC OR ROTARY HOE
5. For large areas, roll the runners into the soil surface with a disc bladed roller. Make sure that all runners are buried.
6. Roll the disc in several different directions ensuring that most of the runners are pressed firmly into, and beneath the soil surface.
7. Alternatively, for smaller areas hoe the runners into the soil with a rotary hoe implement to a depth of 20-30mm.
8. Roll the area with a pedestrian cylinder roller, making sure all runners are buried. A criss-cross action may be necessary for complete coverage. This ensures close contact between runners and soil, which is needed for prompt growth. It also enables you to flatten out any irregularities and form an even surface.
WATERING
Thoroughly water each section immediately after planting. Runners will quickly die if left in dry, hot soil. To establish stolons / runners successfully, it requires double the water frequency for the rst 10 days.
Please be sure to double the frequency in the ‘Watering Guide’.
For areas over 1,000m2, please contact us for a quote on our plug planting service.
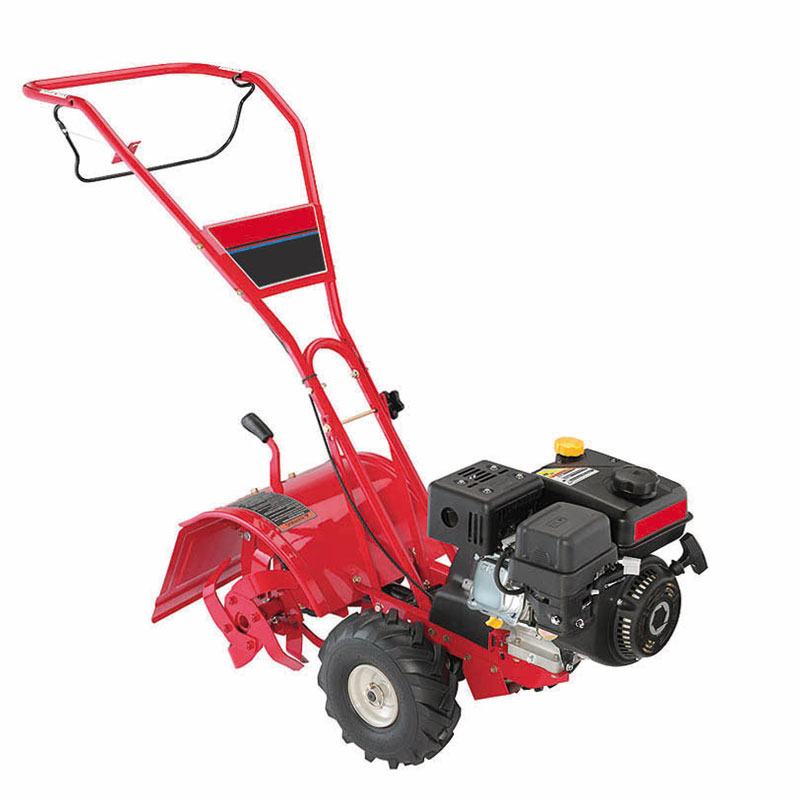
Walk Behind Rotary Hoe
LAYING ROLL ON TURF
Upon receiving your delivery, remove plastic wrapping to avoid heat stress.
Store your turf rolls in the shade and keep them moist. Lay your turf within 24 hours of delivery.
- Distribute starter fertiliser (palletised chicken manure) @ 20kg / 50m2.
- Pick a starting point to lay your border; the longest straight edge such as a fence or paved area is a great starting point. Continue to border your selected area.
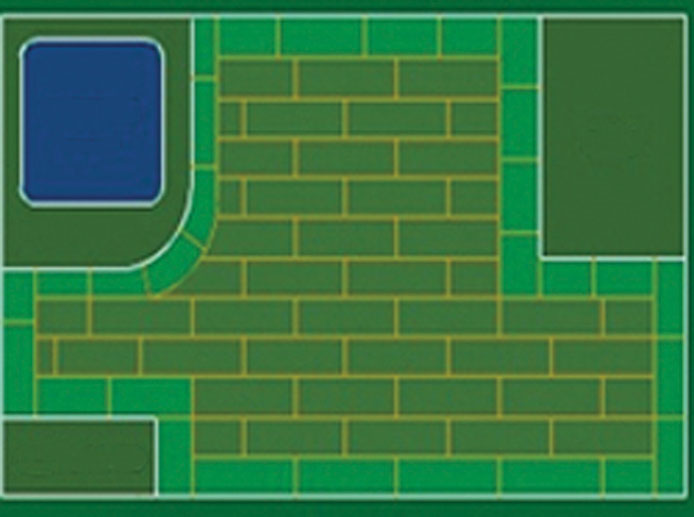
- Lay the rows in a staggered brick work pattern to reduce future erosion. Refer to graphic.
- Lay across slopes rather than down. If the slope is very steep, you may need to hold the rolls in place with a stake until root growth takes hold.
- Roll the turf out making sure all joins are butted tightly together, with no overlapping. Knock the rolls together with the back of a rake. Press the roll edges down with your feet if needed to flatten down edges.
- Use a sharp serrated knife to cut the turf around trees or garden beds
- Ensure there is good contact between the roots of the turf and the soil, leaving no air pockets. It is recommended to compact the lawn with a small plate compactor or roller after completing installation.
A light top soil may be applied to all joins and level any depressions (use yellow sand or the turf underlay soil) – ensure the leaves of the turf are still visible.
Water your lawn within 30 minutes of installation – it should be soaked, not saturated. Ensure that the surface of the lawn is wet through to the root area. Dry patches will quickly die and your new lawn will not survive.
Minimise playing on the turf for at least 2 weeks. For watering, check our Watering Guide
All calculations for your lawn order is required in m2. Our friendly staff will calculate the amount of rolls to cover the area.
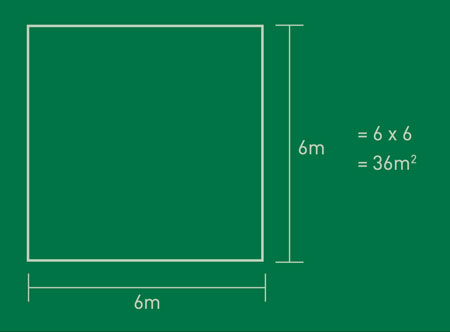 Square and Rectangle
Calculating the area for a square or rectangle is very simple. Get the overall width and the overall length of the square, multiply the two and the result is the area for the square.
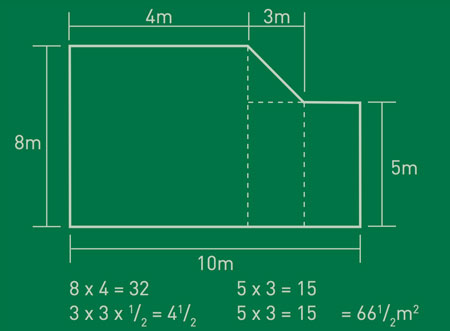 Shapes
The area of shape can be determined by simply breaking the shape into sets of squares, rectangles or triangles. Find the individual areas and add them to give you the total area of the shape.
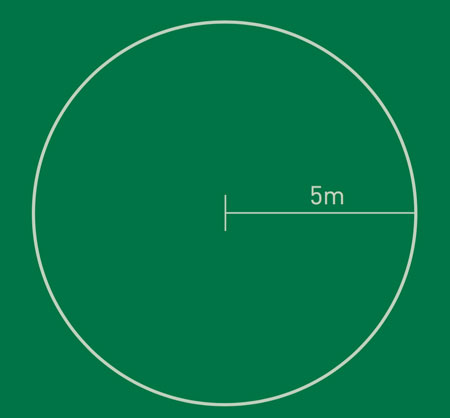
Circle
To calculate the amount of turf you need in square metres, measure the radius of the circle and multiply (radius x radius) x 3.14
Example: radius of 5 m (5 x 5) x 3.14 = 78.5 m2
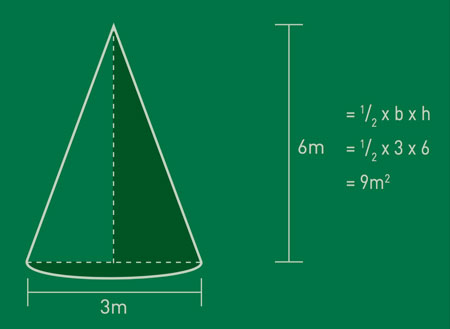
Triangle
Calculating the area for a triangle is done by getting the overall width and the overall length of the triangle, multiply the two and divide by half and the result is the area for the triangle.
PLEASE NOTE: All turf is sold per m2
As a general rule, allow 5% extra m2
eg: 100m2 + 5% = 105m2
These watering guidelines are not necessarily compliant with the water restrictions currently in place. Please check with your local water authority.
HANDY HINTS
• In order to know how much water your reticulation system or sprinklers are applying, you need to measure its output. All you need is an empty ice cream container with a 10mm mark on the inside of the container. Place container on the lawn, turn the sprinklers on and time how long it takes to gather 10mm of water in the container. This is the correct time for that station on your controller or sprinkler. Check your sprinklers’ overlap on different spots around your lawn. Make sure you get an even coverage so that no spots get less than 10mm in that time. This may mean some spots get more than 10mm.
• If your lawn show signs of stress (wilting and discolouration), you will need to give it a good drink of 10mm of water per day until the colour comes back. Water by hand on off-roster days. In most cases, dry spots should be treated with BI-AGRA which is a combination of wetting agent and moisture retaining aid, to help with water uptake.
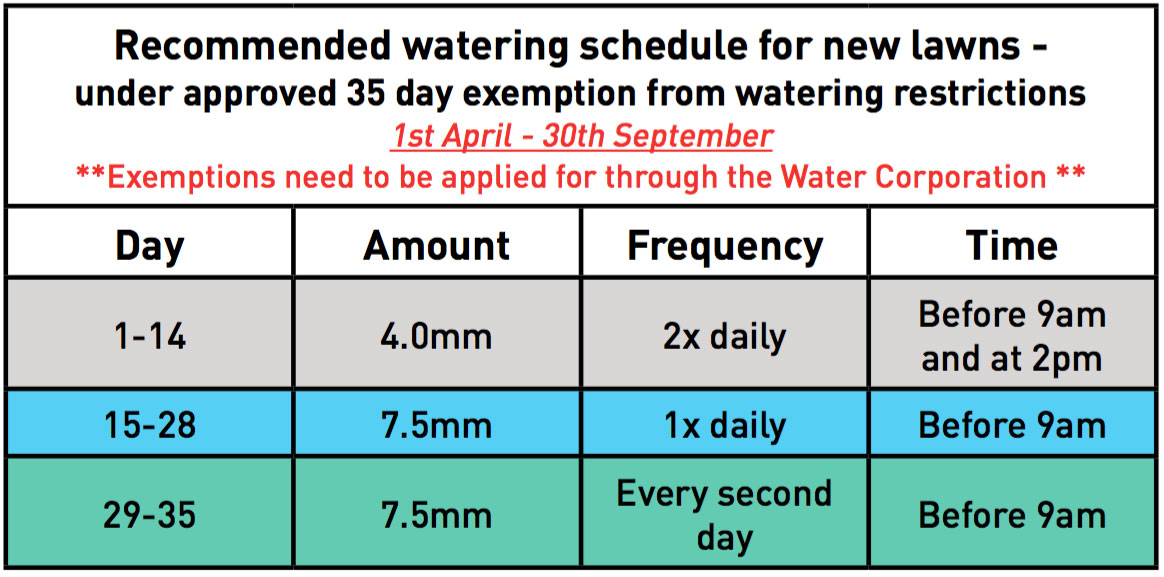
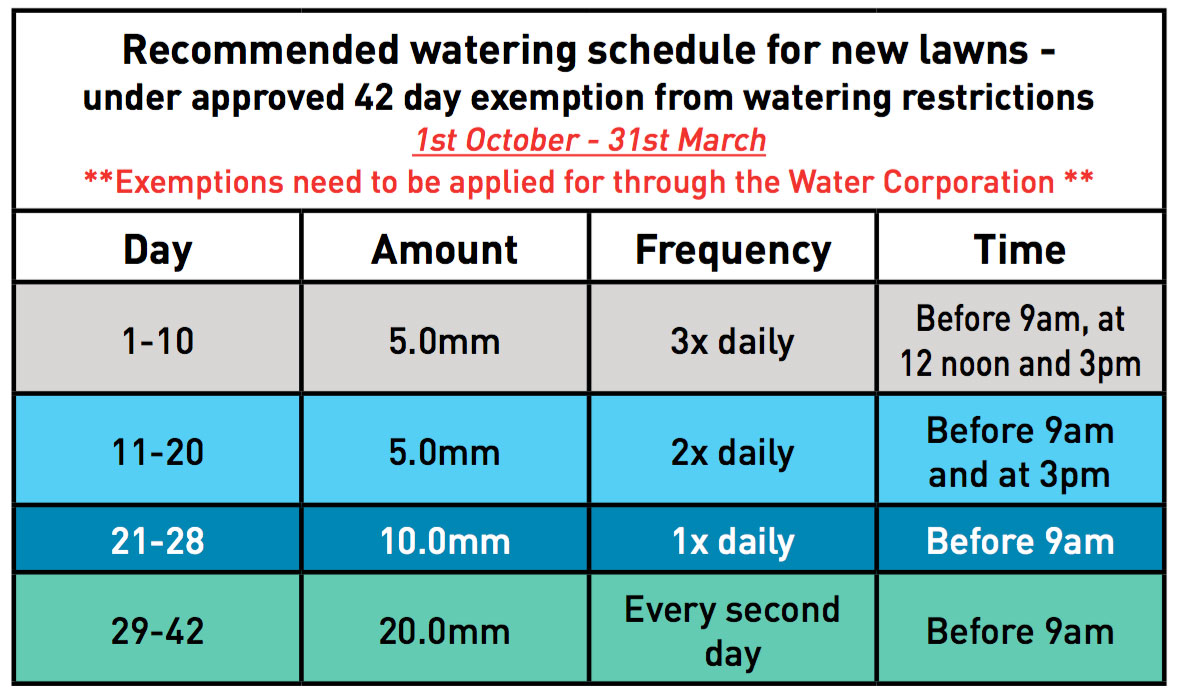
If you are establishing a lawn or garden, you must apply for a water exemption. This will allow you to water enough days to establish your lawn and garden.
For exemption, contact your local household water supplier or visit: www.watercorporation.com.au
Turf is not only a major source of beauty and comfort in our lives; it provides us with oxygen, cleans our water supplies, reduces carbon dioxide and cools our surrounds.
Turf has a positive role to play in combating the build-up of carbon dioxide and other greenhouse gasses, caused by the burning of fossil fuels and a range of other human activities. In this way, turf can help in the fight against global warming.
TURF REDUCES HEAT
- It makes your surrounding environment cooler and decreases the energy needed to cool your home.
- The temperature on a green lawn in mid summer is: 10°C less than bare soil 20°C less than bitumen, concrete or pebble mulch 40°C less than dry synthetic turf
- One average front lawn has the cooling effect of 8.75 tons of air conditioning, without the accompanying negative effects on the environment. An average home air conditioner only has a 3-4 ton capacity and increases carbon dioxide emissions.
- Grass provides a greater cooling effect than trees and can achieve the same cooling effect as a pool or lake, with 40% less water evaporation.
Every day a 58m2 lawn provides all the oxygen needed by one person for a day!
One acre of grass produces more oxygen per year than one acre of rainforest.
True Blue Turf is a supplier of artificial grass. As the leading turf supplier of natural turf in the South West, we play with open cards when it comes to facts and honesty. You decide for yourself! Despite our advances in science, no kind of artificial turf can effectively replace natural grass. We acknowledge that in some cases artificial lawn may be the only option.
The maximum safe temperature for a playing surface is 49°C, because temperatures of 50°C and higher can cause skin injury in less than 10 minutes. After observing exceedingly hot temperatures from the synthetic turf, a case was recorded that a coach received blisters on his feet through his tennis shoes. Another startling observation from the study included 93° C was the highest surface temperature recorded on artificial turf on a 37° C day. Studies suggest that carbon fibers used in some artificial turf are as unsafe as asbestos when inhaled.
Whether by hand or withheld magnets, small objects and materials must be meticulously removed and liquids or other residues must be thoroughly cleaned and disinfected regularly. Some common elements that home owners must cleanse or remove regularly include:
✖ Food and beverages
✖ Vomit
✖ Gum Metal particles
✖ Wooden splinters
✖ Blood
✖ Animal droppings and
✖ urine
MYTH: Artificial turf is better for the environment, because it doesn’t require water.
FACT: While natural grass requires water to remain healthy, its resulting benefits to the environment far outweigh those costs.
While man struggles to create an imitation of turf with even half the benefits of natural grass, scientists are working with nature to develop stronger, more wear resistant and generally improved natural turf varieties.
The frightening effects of artificial turf on both humans and the environment are already being corrected by natural grass on a daily basis. Athletes and coaches, professionals and amateurs, fans and homeowners all prefer the joy that natural grass brings into their lives. The costs of installing and maintaining a natural lawn provides a far better short- and long-term value than the costs of artificial turf, especially when considering wear and lifespan.
Natural grass is a vital part of a balanced environment, one that future generations should be allowed to enjoy and benefit from as much as we have.